May 6, 2022
Connect Multiple Repositories on Gitpod using Tailscale
So, you are working on multiple services that need to talk to each other. Each part of your application lives in a different repository, or you might be collaborating on an integration project involving more than one product from different teams. With Gitpod, you set up secure and isolated cloud workspaces for your git repositories.
But how do we make workspaces talk to each other securely?
We have teamed up with our friends at Tailscale to bring an easy way to solve this problem using their simple zero-config VPN, which comes pre-installed in Gitpod workspaces. Tailscale’s secure mesh technology based on WireGuard can connect machines securely across the internet, such as your Gitpod workspaces or a cloud or on-prem resource, like a database, frictionlessly. ✨
This guide will show how easy it is to connect Gitpod workspaces over a secure tunnel provided by Tailscale. Let’s get started 🚀
A case for working with multiple repositories at a time
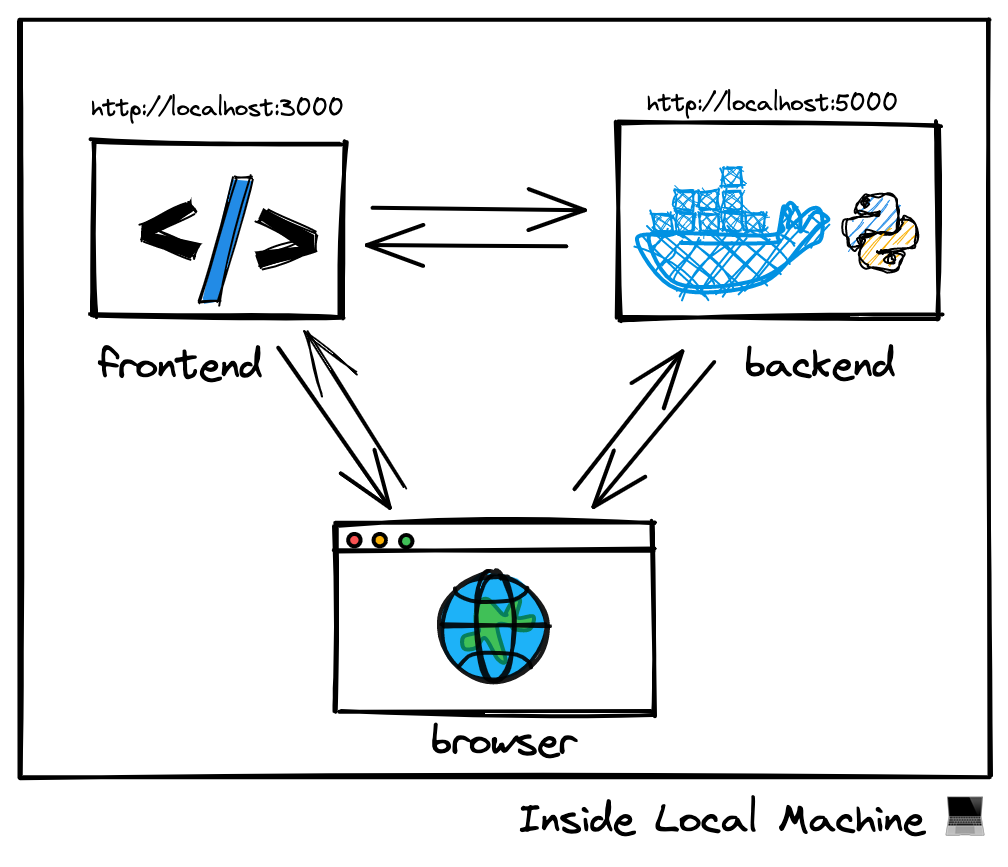
A typical architecture these days is server-side rendering (SSR). You generate the view by calling backend services on the frontend server instead of calling your API from client devices. If you develop on your local machine, two repositories will be open in two IDE windows. Every service can communicate with each other as they are all running on the same machine.

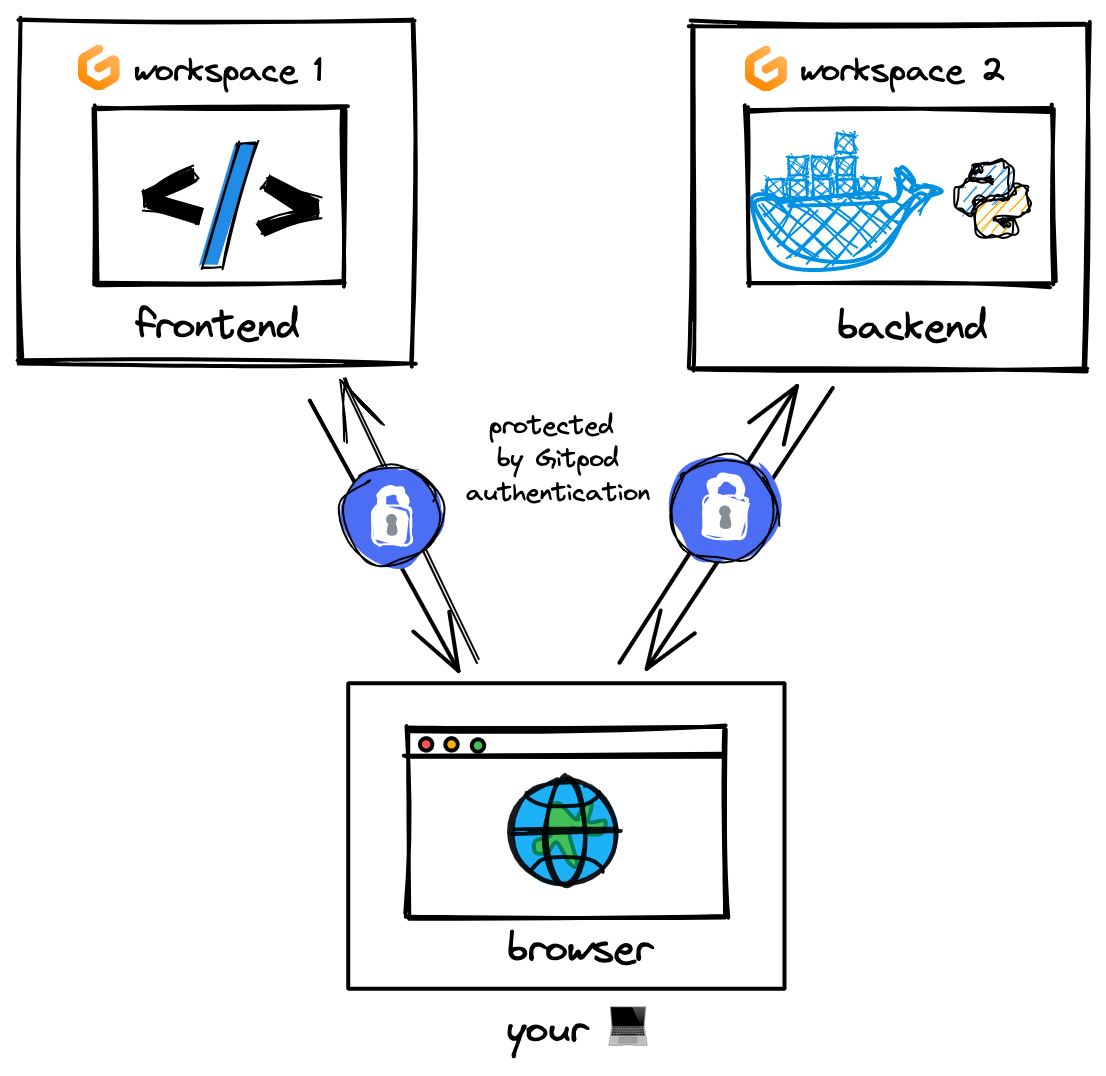
In Gitpod, each workspace runs in a secure sandbox. You can expose ports so that only your browser can access them. However, the workspaces cannot communicate with one another.

As long as only the browser interacts with the API, this will work with Gitpod without any changes. If you develop single-page applications and static sites where every network request is a client-side fetch, you don’t need Tailscale.
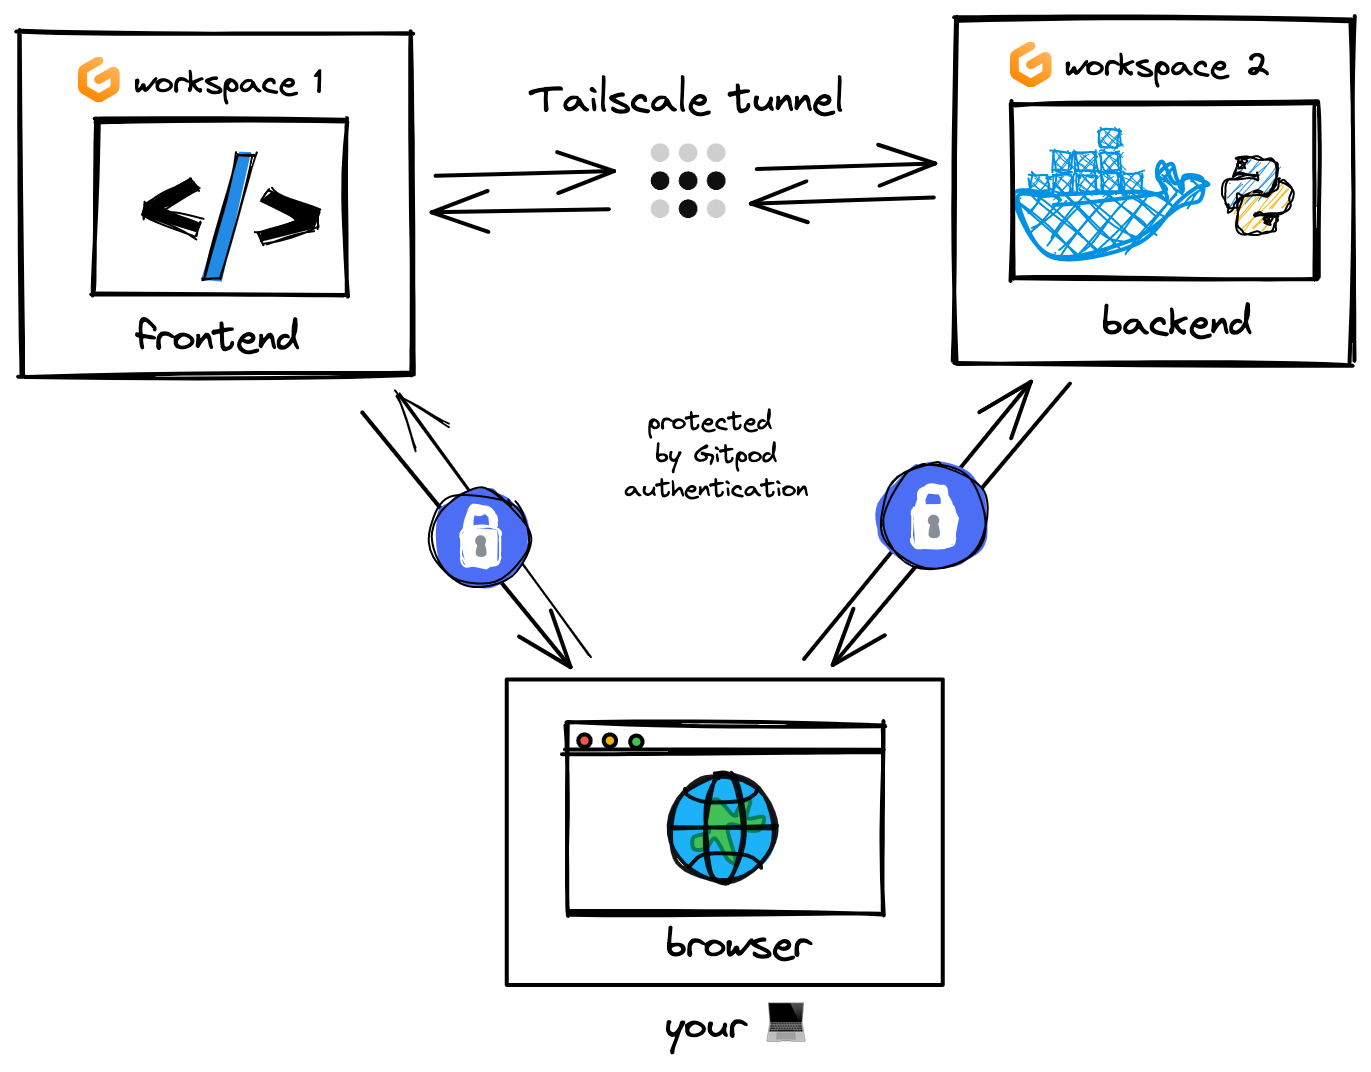
But if your application has a server-side that needs to fetch data from another workspace, it becomes a networking problem. The application server requires a secure network tunnel between them to send a request outside of its workspace and into the API workspace.
This is what Tailscale is made for ✨

Connecting multiple workspaces together with Tailscale
We can run Tailscale in each of our Gitpod workspaces, which will make them part of your “tailnet”, a secure VPN consisting of your machines that can access each other. Traffic over your “tailnet” is fully end-to-end encrypted, with each workspace having its private key, so anyone, not even Tailscale, is capable of reading the traffic.
In Gitpod, each workspace can log into Tailscale and receive a list of secure IP addresses of other workspaces connected to your “tailnet”. It is only possible to connect to these IPs from machines running Tailscale, which can be your workspaces or your local machines.
Tailscale comes pre-installed with gitpod/workspace-full, Gitpod’s base image for workspaces. So if you are using the default image or a custom docker image based on workspace-full, you are ready to go 🚀; else, you will need to add instructions to install Tailscale into your workspace.
1. Add Tailscale to your .gitpod.yml tasks
Scroll to the bottom of this page for an example .gitpod.yml file, or follow these steps to set it up for yourself.
The “Connect to Tailscale” task will prompt you to log in. We only need to do this once. Next time, we fetch the token from Gitpod’s environment variables to skip the login.
The “Restore Tailscale daemon” task launches Tailscale and puts it in the background. It connects the workspace to your “tailnet” using your previously saved Tailscale token.
tasks:
    - name: Restore Tailscale daemon
      command: |
          if [ -n "${TS_STATE_TAILSCALE_EXAMPLE}" ]; then
            # restore the tailscale state from gitpod user's env vars
            sudo mkdir -p /var/lib/tailscale
            echo "${TS_STATE_TAILSCALE_EXAMPLE}" | sudo tee /var/lib/tailscale/tailscaled.state > /dev/null
          fi
          sudo tailscaled
    - name: Connect to Tailscale
      command: |
          if [ -n "${TS_STATE_TAILSCALE_EXAMPLE}" ]; then
            sudo -E tailscale up
          else
            sudo -E tailscale up --hostname "gitpod-${GITPOD_GIT_USER_NAME// /-}-$(echo ${GITPOD_WORKSPACE_CONTEXT} | jq -r .repository.name)"
            # store the tailscale state into gitpod user
            gp env TS_STATE_TAILSCALE_EXAMPLE="$(sudo cat /var/lib/tailscale/tailscaled.state)"
          fi
          exit
2. Open a workspace for each repository
Commit the .gitpod.yml to your repository.
Next time when you launch your workspace, your Gitpod terminal will give you a login link with a unique token. Once you’ve logged in, it will connect your workspace to your Tailscale account.
Tailscale allows you to log in via GitHub, Google, Microsoft, or email. As long as you are logged in to the same organization in each of your repositories, your Gitpod workspaces will be able to send requests to each other.
3. View your connected workspaces
Run tailscale status to see the private IP addresses for your other workspaces. These are only accessible to other Tailscale nodes. Your workspaces can communicate with each other, but neither your browser nor anyone else will be able to access them.
$ tailscale status
100.11.166.123  main-backend-service username@  linux   -
100.11.201.28   main-application username@  linux   -
Gitpod is all about giving you a great developer experience. So if you have to look up IP addresses every time you make a workspace, it isn’t great.
We can use a .gitpod.yml task to search Tailscale and create environment variables for each connected service.
Let’s say backend-service is the name of the repository you want to connect. You can find its IP address by running the following command:
$ tailscale status | grep backend-service | cut -d " " -f 1
100.11.166.123
You can set the result as an environment variable so that your application can use it later.
In this example, this task looks for backend-service and sets an environment variable named API_URL pointing to it before launching the application.
- name: Start application
  init: npm install
  command: |
      REPO_NAME=backend-service
      API_IP=$(tailscale status | grep $REPO_NAME | cut -d " " -f 1)
      if [ "${API_IP}" ]; then
        echo "🐳 Connected to $REPO_NAME through Tailscale"
        API_URL="http://$API_IP:5000/api" npm run dev
      else
        echo "🐳 Failed to connect to $REPO_NAME. Make sure a $REPO_NAME workspace is active and logged into Tailscale."
        npm run dev
      fi
  env:
      PORT: 3000
      NODE_ENV: development
To try this out, add this task to the tasks list in your .gitpod.yml file, commit it, and try it out with a new workspace. Your workspaces should be able to send requests to each other through their secure Tailscale IP addresses. Now you are fully set up for multi-repo development on Gitpod. ✨
Sample .gitpod.yml
image: gitpod:workspace/full
ports:
    - port: 3000
      onOpen: ignore
tasks:
    - name: Restore Tailscale daemon
      command: |
          if [ -n "${TS_STATE_TAILSCALE_EXAMPLE}" ]; then
            # restore the tailscale state from gitpod user's env vars
            sudo mkdir -p /var/lib/tailscale
            echo "${TS_STATE_TAILSCALE_EXAMPLE}" | sudo tee /var/lib/tailscale/tailscaled.state > /dev/null
          fi
          sudo tailscaled
    - name: Start application
      init: |
          eval $(gp env -e)
          npm install
      command: |
          REPO_NAME=backend-service
          API_IP=$(tailscale status | grep $REPO_NAME | cut -d " " -f 1)
          if [ "${API_IP}" ]; then
            echo "🐳 Connected to $REPO_NAME through Tailscale"
            API_URL="http://$API_IP:5000/api" npm run dev
          else
            echo "🐳 Failed to connect to $REPO_NAME. Make sure a $REPO_NAME workspace is active and logged into Tailscale."

            npm run dev
          fi
      env:
          PORT: 3000
          NODE_ENV: development
    - name: Connect to Tailscale
      command: |
          if [ -n "${TS_STATE_TAILSCALE_EXAMPLE}" ]; then
            sudo -E tailscale up
          else
            sudo -E tailscale up --hostname "gitpod-${GITPOD_GIT_USER_NAME// /-}-$(echo ${GITPOD_WORKSPACE_CONTEXT} | jq -r .repository.name)"
            # store the tailscale state into gitpod user
            gp env TS_STATE_TAILSCALE_EXAMPLE="$(sudo cat /var/lib/tailscale/tailscaled.state)"
          fi
          exit